> ## Documentation Index
> Fetch the complete documentation index at: https://help.tiretutor.ai/llms.txt
> Use this file to discover all available pages before exploring further.
# Creating a work order
> Start a work order for a customer at your store, or turn an approved estimate into one.
A work order is the job for one visit. It holds the customer, the vehicle, and the work you do. You take payment on it when the job is done.
There are two ways to start one. Select **New Work Order** for a customer at your counter. Or approve an estimate the customer has said yes to.
## Start a new work order
In the side menu, select **POS** › **Work Orders**.
Select **New Work Order** at the top right of the list.
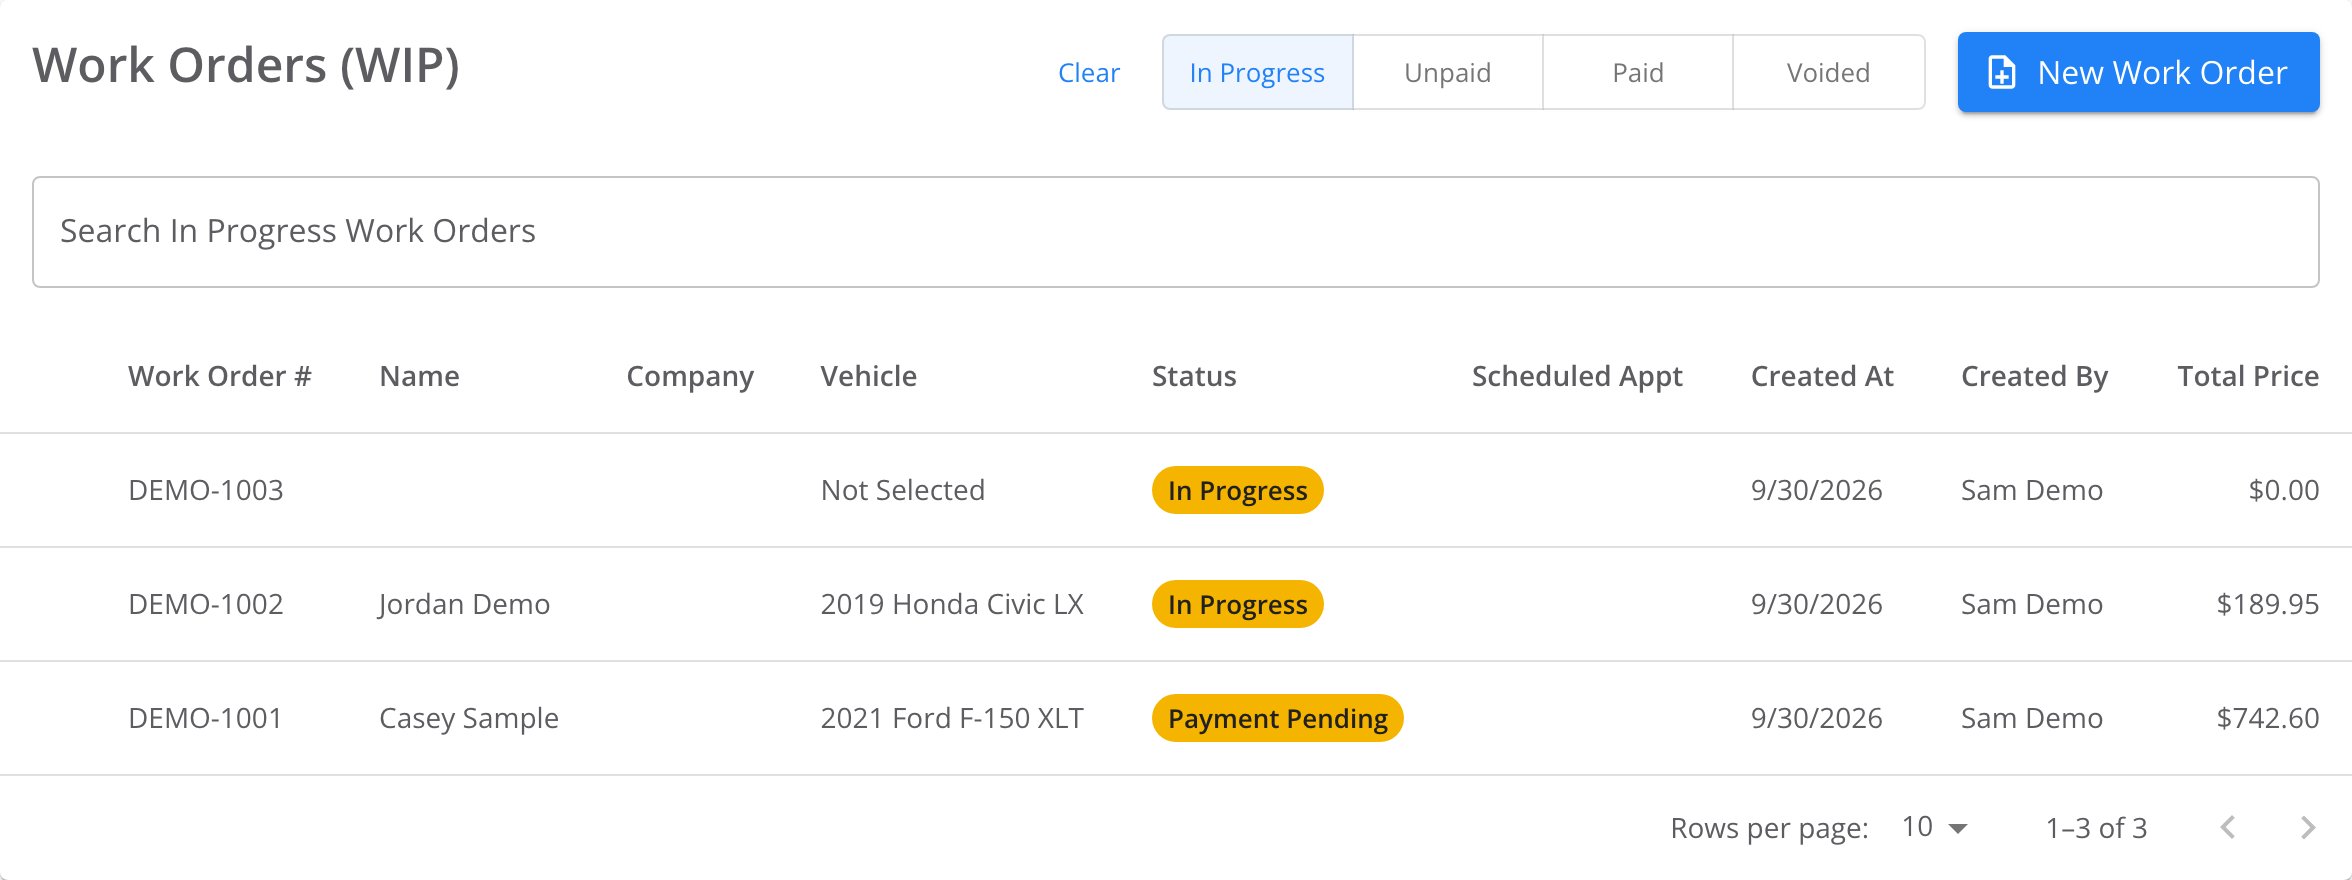 TireTutor opens the new work order right away. There is no form to fill in first. The order starts as **In Progress**, with no customer, no vehicle, and no work on it. It belongs to the store you have open.
Each time you select **New Work Order**, TireTutor makes a new order. Select it once per job.
## Add the customer
Start in the **Customer Details** card on the work order.
Type in **Search by name, phone, or plate**.
Select the customer in the list. TireTutor adds them to the work order.
### Add a customer who is not in the list
The last entry in the list is the name you typed, marked **Add as a Customer**.
TireTutor opens the new work order right away. There is no form to fill in first. The order starts as **In Progress**, with no customer, no vehicle, and no work on it. It belongs to the store you have open.
Each time you select **New Work Order**, TireTutor makes a new order. Select it once per job.
## Add the customer
Start in the **Customer Details** card on the work order.
Type in **Search by name, phone, or plate**.
Select the customer in the list. TireTutor adds them to the work order.
### Add a customer who is not in the list
The last entry in the list is the name you typed, marked **Add as a Customer**.
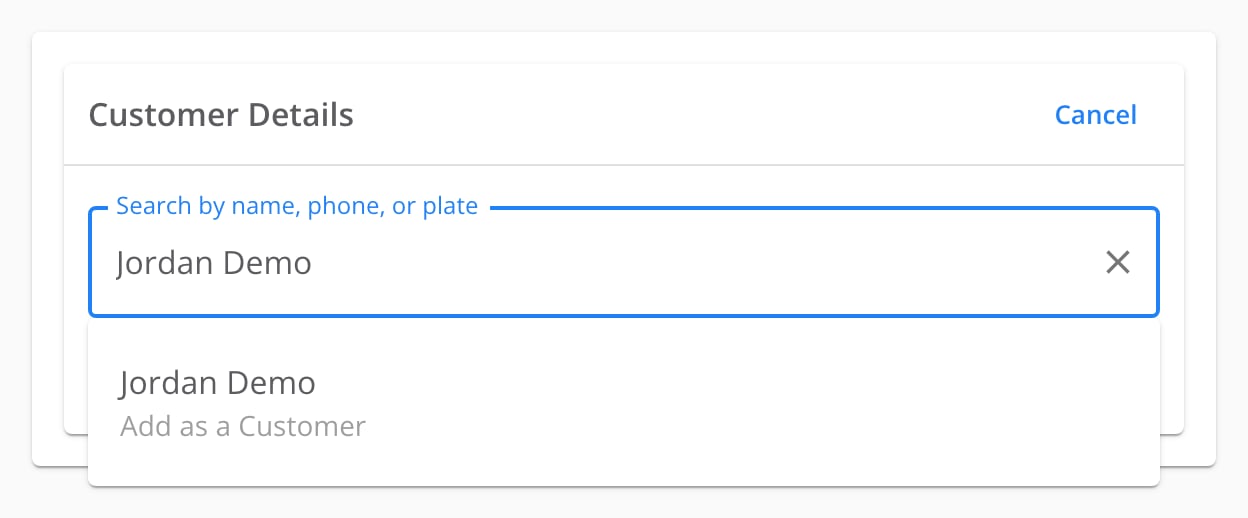 Type the customer's first and last name in the search box.
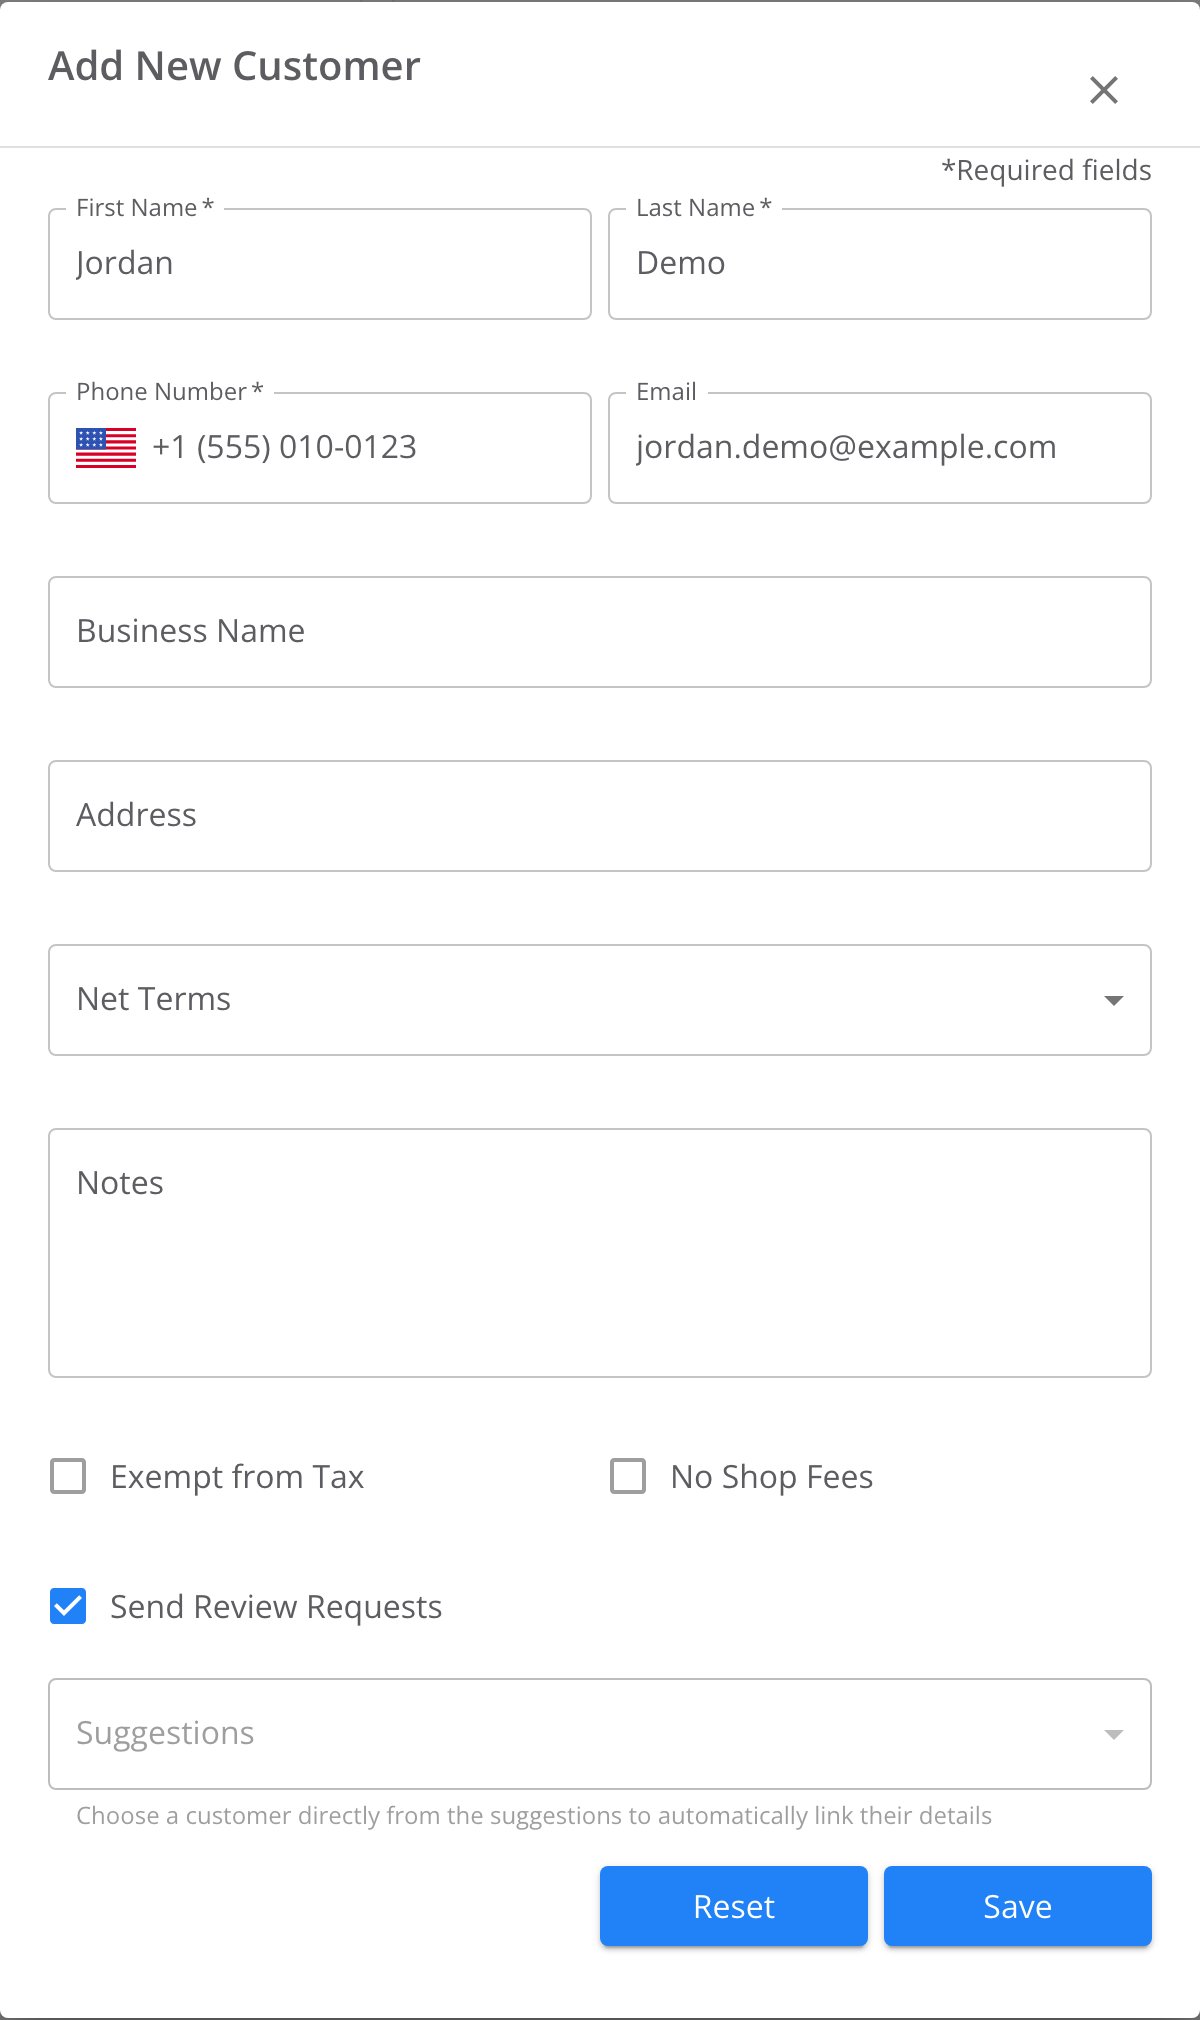
Select the entry marked **Add as a Customer**. The **Add New Customer** dialog opens. **First Name** and **Last Name** hold the name you typed.
Enter the customer's number in **Phone Number**.
Add an email address or any other details you have. Only the fields marked with an asterisk are required.
**Suggestions** lists customers who already have this phone number or email. If the customer is there, select them. TireTutor then uses that record.
Select **Save**.
Type the customer's first and last name in the search box.
Select the entry marked **Add as a Customer**. The **Add New Customer** dialog opens. **First Name** and **Last Name** hold the name you typed.
Enter the customer's number in **Phone Number**.
Add an email address or any other details you have. Only the fields marked with an asterisk are required.
**Suggestions** lists customers who already have this phone number or email. If the customer is there, select them. TireTutor then uses that record.
Select **Save**.
 The customer's name now shows in **Customer Details**.
## Add the vehicle
Start in the **Vehicle Details** card on the work order.
Select the **Select Vehicle** box. It lists the customer's vehicles.
Select the vehicle in the list. If the list does not show it, type the full plate number or VIN.
If the vehicle is still not in the list, select **New Vehicle**. Then follow [Adding a vehicle](/dealers/pos/adding-a-vehicle).
The vehicle dialog has a **No Vehicle** checkbox. Use it only when the job does not need a vehicle. On the **Approval before billing, California BAR** setting, TireTutor cannot complete a work order with no vehicle. See [Customer authorizations](/dealers/pos/managing-customer-authorizations).
## Add the work
Start in **Labor and Parts Lookup** on the work order.
Select **Add Service**.
Type the labor, part, or service you want in **Search**.
Select the checkbox beside each line you want to add.
Select **Add Service** on that service.
Repeat these steps for each job on the order. To add tires, select **Add Tires** next to **Add Service**. It opens the tire catalog.
## Turn an approved estimate into a work order
Open the estimate. Select **Approve**. What happens next depends on your store's customer authorization setting.
* **Don't ask**: TireTutor turns the estimate into a work order right away. The **Approve** button changes to **View Work Order**.
* **Any other setting**: TireTutor first asks what the customer approved. It then asks **Start the work order?** Select **Convert to work order**.
[Customer authorizations](/dealers/pos/managing-customer-authorizations) walks through each screen of that dialog.
## How you know it worked
The work order shows its number at the top, with an **In Progress** chip. It appears in the **Work Orders** list under the **In Progress** filter. The list shows the customer, the vehicle, and the total once you add them.
## If it doesn't work
* **The customer search finds nobody.** Check the spelling, or search by phone number instead. If the customer is new, choose **Add as a Customer**.
* **You see "You are in view-only mode".** The work order belongs to another of your stores. Switch to that store to make changes.
* **You still need help.** Contact TireTutor support.
## Where to go next
Look up a vehicle by VIN or plate, or enter it by hand.
Add a service writer and technician to the work order.
Take a card payment, or record cash, check, or Zelle.
Void an unpaid work order and find it later.
This documentation is built and hosted on [Mintlify](https://mintlify.com), a developer documentation platform.
The customer's name now shows in **Customer Details**.
## Add the vehicle
Start in the **Vehicle Details** card on the work order.
Select the **Select Vehicle** box. It lists the customer's vehicles.
Select the vehicle in the list. If the list does not show it, type the full plate number or VIN.
If the vehicle is still not in the list, select **New Vehicle**. Then follow [Adding a vehicle](/dealers/pos/adding-a-vehicle).
The vehicle dialog has a **No Vehicle** checkbox. Use it only when the job does not need a vehicle. On the **Approval before billing, California BAR** setting, TireTutor cannot complete a work order with no vehicle. See [Customer authorizations](/dealers/pos/managing-customer-authorizations).
## Add the work
Start in **Labor and Parts Lookup** on the work order.
Select **Add Service**.
Type the labor, part, or service you want in **Search**.
Select the checkbox beside each line you want to add.
Select **Add Service** on that service.
Repeat these steps for each job on the order. To add tires, select **Add Tires** next to **Add Service**. It opens the tire catalog.
## Turn an approved estimate into a work order
Open the estimate. Select **Approve**. What happens next depends on your store's customer authorization setting.
* **Don't ask**: TireTutor turns the estimate into a work order right away. The **Approve** button changes to **View Work Order**.
* **Any other setting**: TireTutor first asks what the customer approved. It then asks **Start the work order?** Select **Convert to work order**.
[Customer authorizations](/dealers/pos/managing-customer-authorizations) walks through each screen of that dialog.
## How you know it worked
The work order shows its number at the top, with an **In Progress** chip. It appears in the **Work Orders** list under the **In Progress** filter. The list shows the customer, the vehicle, and the total once you add them.
## If it doesn't work
* **The customer search finds nobody.** Check the spelling, or search by phone number instead. If the customer is new, choose **Add as a Customer**.
* **You see "You are in view-only mode".** The work order belongs to another of your stores. Switch to that store to make changes.
* **You still need help.** Contact TireTutor support.
## Where to go next
Look up a vehicle by VIN or plate, or enter it by hand.
Add a service writer and technician to the work order.
Take a card payment, or record cash, check, or Zelle.
Void an unpaid work order and find it later.
This documentation is built and hosted on [Mintlify](https://mintlify.com), a developer documentation platform.