

What it is
The scheduler is the calendar under Scheduler in the CRM group of your dashboard. It shows the work your shop has booked, color-coded by the kind of job and by where the work order stands. This guide covers the interactive calendar, which your shop needs turned on. If Scheduler opens a different scheduling page, contact support. It is a working calendar, not a report. Drag an appointment to a new time and the calendar saves the change to the work order. The calendar shows only the shop you currently have selected. Pick a different shop and the calendar reloads for that one.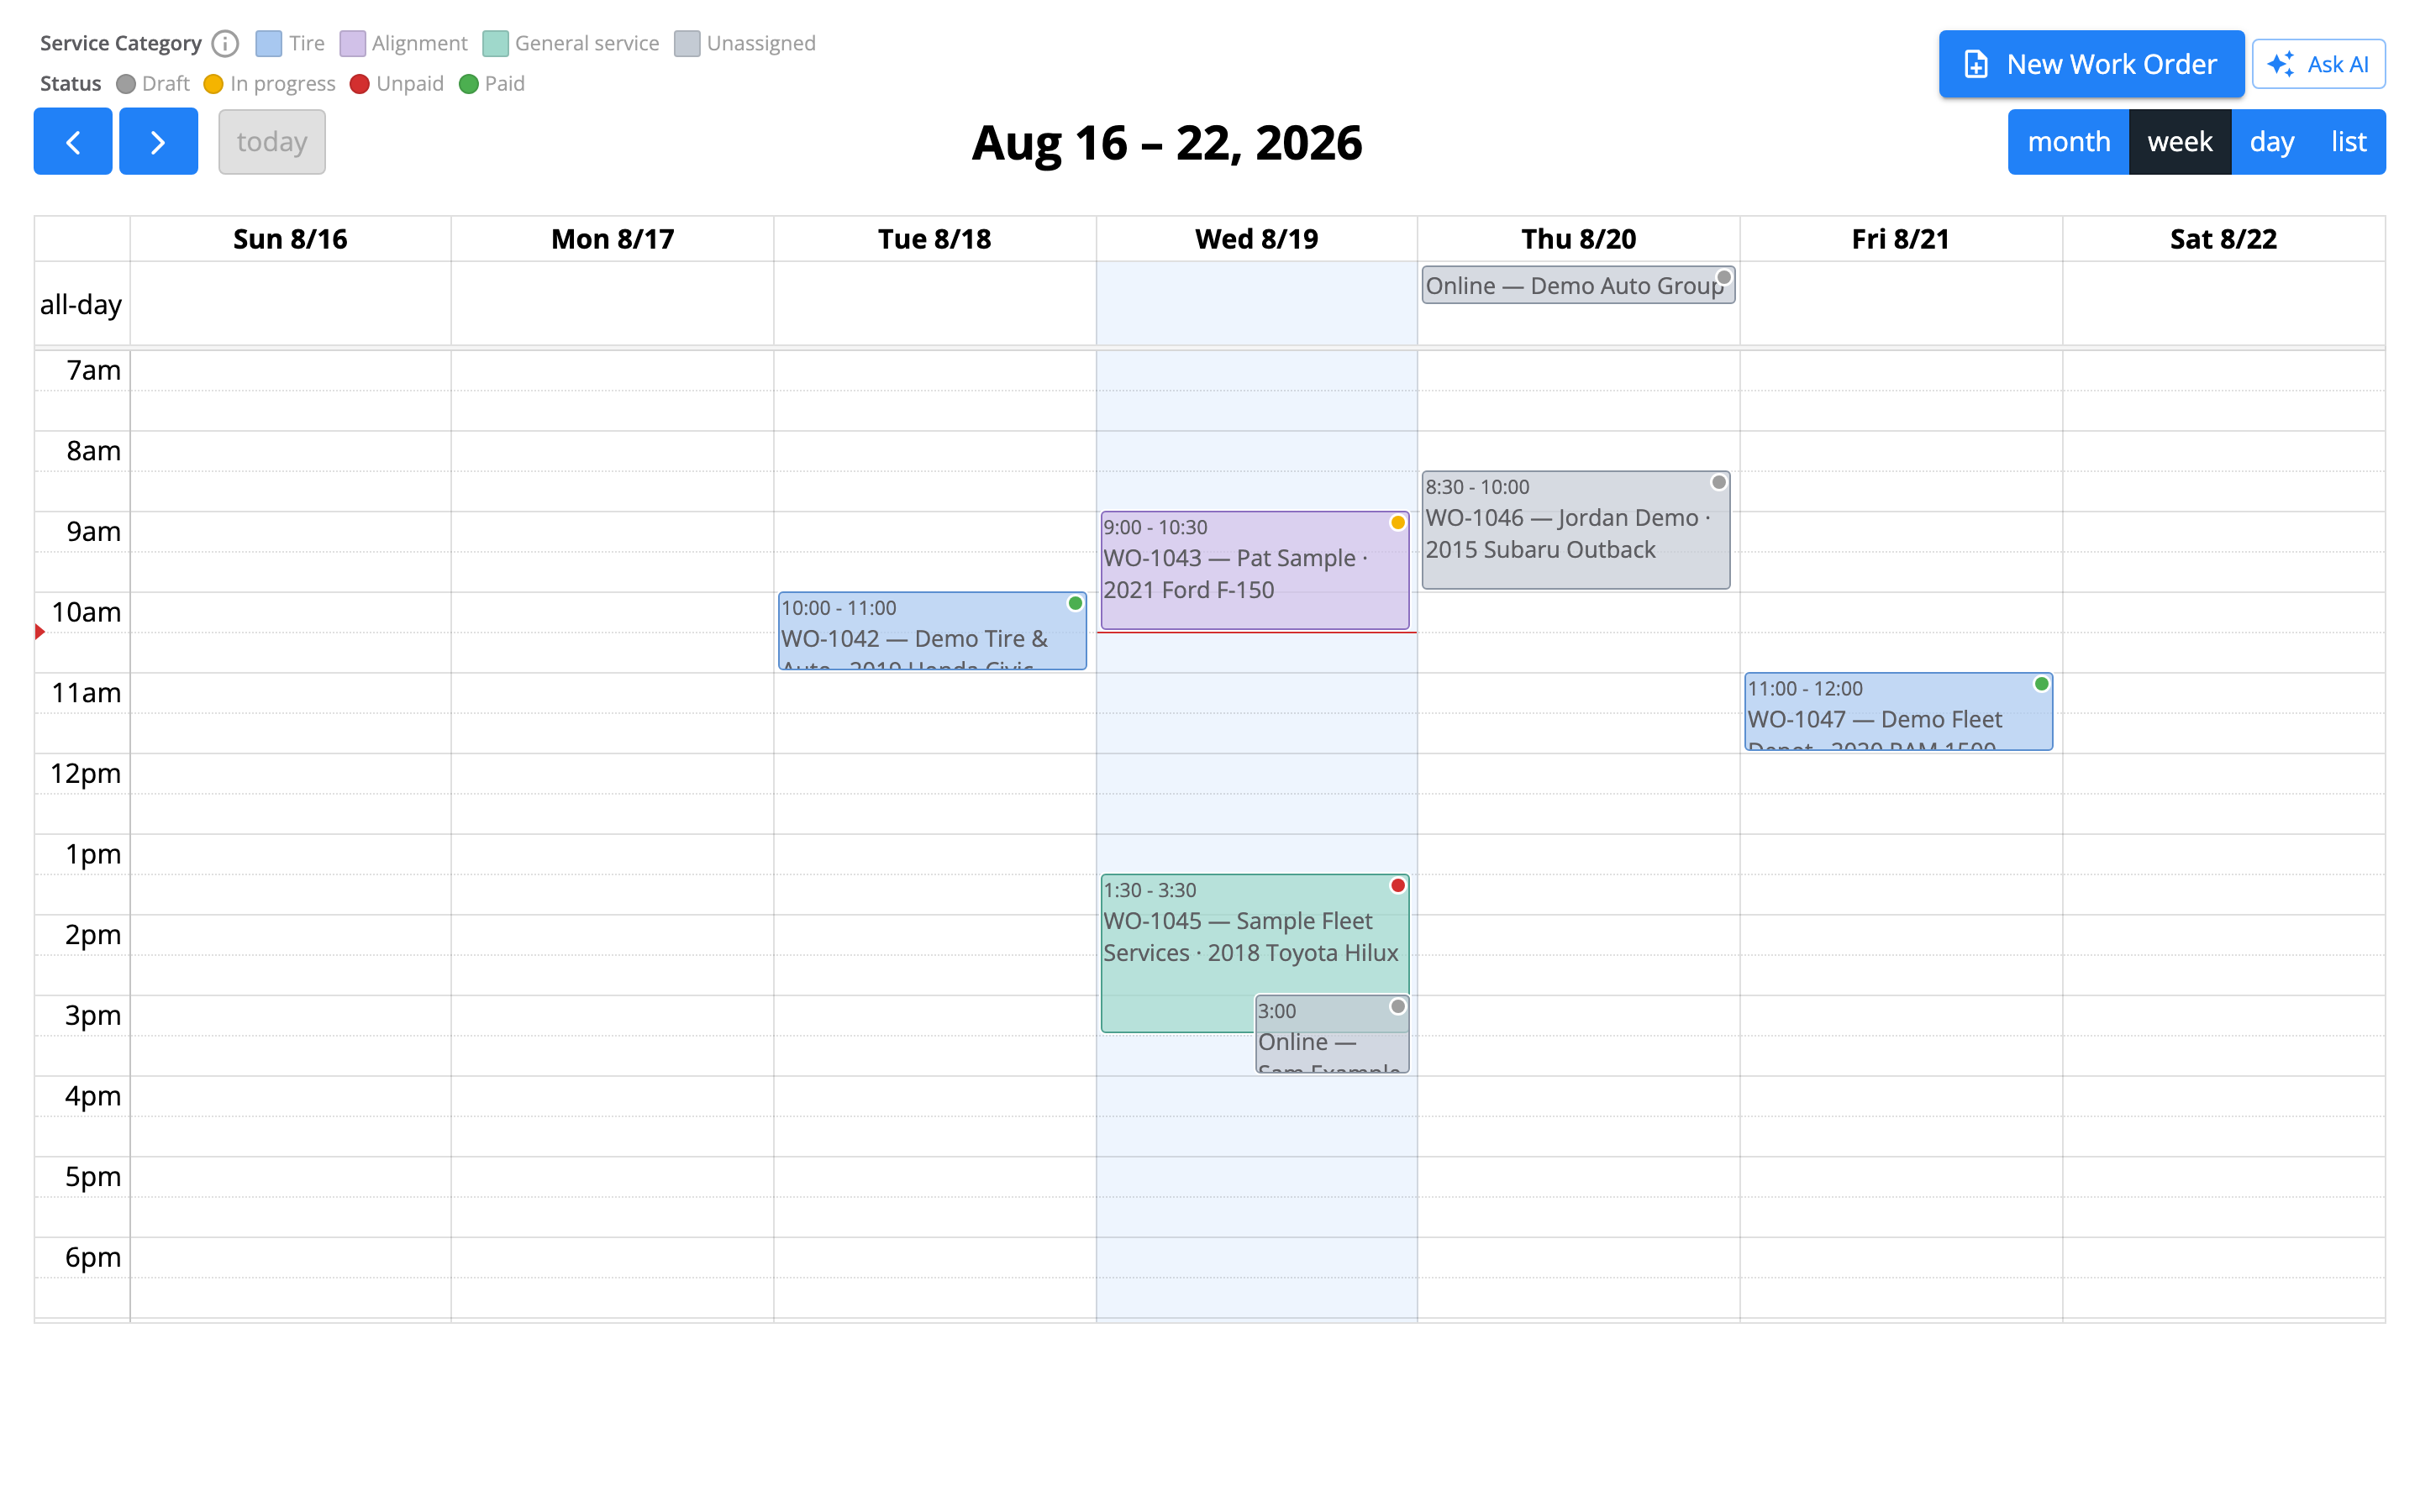
The week view. Block color is the service category, the dot is work order status, and the keys above the grid explain both. A short block clips its own text at the block edge.
Open the scheduler
If your shop has Scheduler turned on, it sits in the CRM group of the left-hand navigation. Choose it to open the calendar. There is nothing to install.Choose a view
The view switcher sits in the top right on a computer.
Arrows and a today button sit in the top left. In the week and day views, a red line marks the current time across today’s column. A small red arrow sits beside it in the time column.
The grid opens already scrolled down to just before your opening time, so you see the working day without scrolling. It does not stop at your closing time. A job booked outside your posted hours still appears, because work your shop genuinely took must never vanish from the calendar.
What appears on the calendar
Work orders that carry an appointment time. The block’s length comes from the duration on the appointment. Without one, it uses the total labour hours on the work order. Without those, it uses one hour. Online orders — bookings your website took. Where the customer picked a time, the booking sits at that time. Where only a date exists, it appears as an all-day marker at the top of that day. An online order with no appointment date does not appear at all. You cannot drag or resize an online order, because that time belongs to the customer’s booking rather than to a work order you control. The calendar cannot place a work order that has no appointment time, so it leaves those off the grid. On a computer, a line above the calendar tells you how many it left off. A phone hides that line. The count covers only the work orders the calendar loaded. When the calendar also warns you it is not showing everything, read that count as a floor rather than a total. Voided work orders never appear.Reading the colors
Each appointment carries two separate pieces of color information, and the grid has a key for each: one for service category, one for status. On a phone both start collapsed, and each has its own arrow — opening one leaves the other closed. The two systems deliberately look different. Service categories are soft pastels. Statuses are strong traffic-light colors. Muted color tells you the kind of work. Vivid color tells you where the work order stands. The block’s fill is its service category:
A small dot on the block is its status:
The dot carries the work order’s status, not its payment state alone — a draft has no payment to report. It lets you read status without relying on the fill, which already does a different job. Note that the mint green of the General service category and the vivid green of the Paid status mean different things.
Move or resize an appointment
Move it — drag the block to a new day or time. The block moves at once, and the calendar saves the new time in the background. A confirmation reading Appointment updated appears when the save completes. Change its length — drag the bottom edge of the block. The confirmation for this one reads Duration updated. Until the confirmation appears, the block shows where you dragged it, not what the work order holds. If saving a move or resize fails, the block returns to its previous position and an error appears.Open an appointment
Click a block to open a card. What the card shows depends on the kind of entry. A work order card starts with the order number beside its service-category swatch, then the time. The customer and the vehicle follow, when the work order has them. Two chips come next: the status, and the order type such as Vehicle or Delivery. The last line reads Work order. A pencil in the corner opens the edit dialog. An online order card starts with the heading Online order. It shows the time, the customer, a chip for the kind of booking, and a Payment line with the payment status. The last line reads Online order (web booking). It has no pencil, because you cannot edit a web booking from the calendar. The buttons at the foot of the card also depend on the kind of entry:- Open work order — on a work order card. Go to the full work order.
- Convert to work order — on an online order card. The booking becomes a work order, and the calendar opens it for you.
- Open online order — on an online order card. Go to the online order itself.
- Cancel order — on an online order card whose payment is still pending. The button changes to Confirm cancel. Select it to cancel the order.
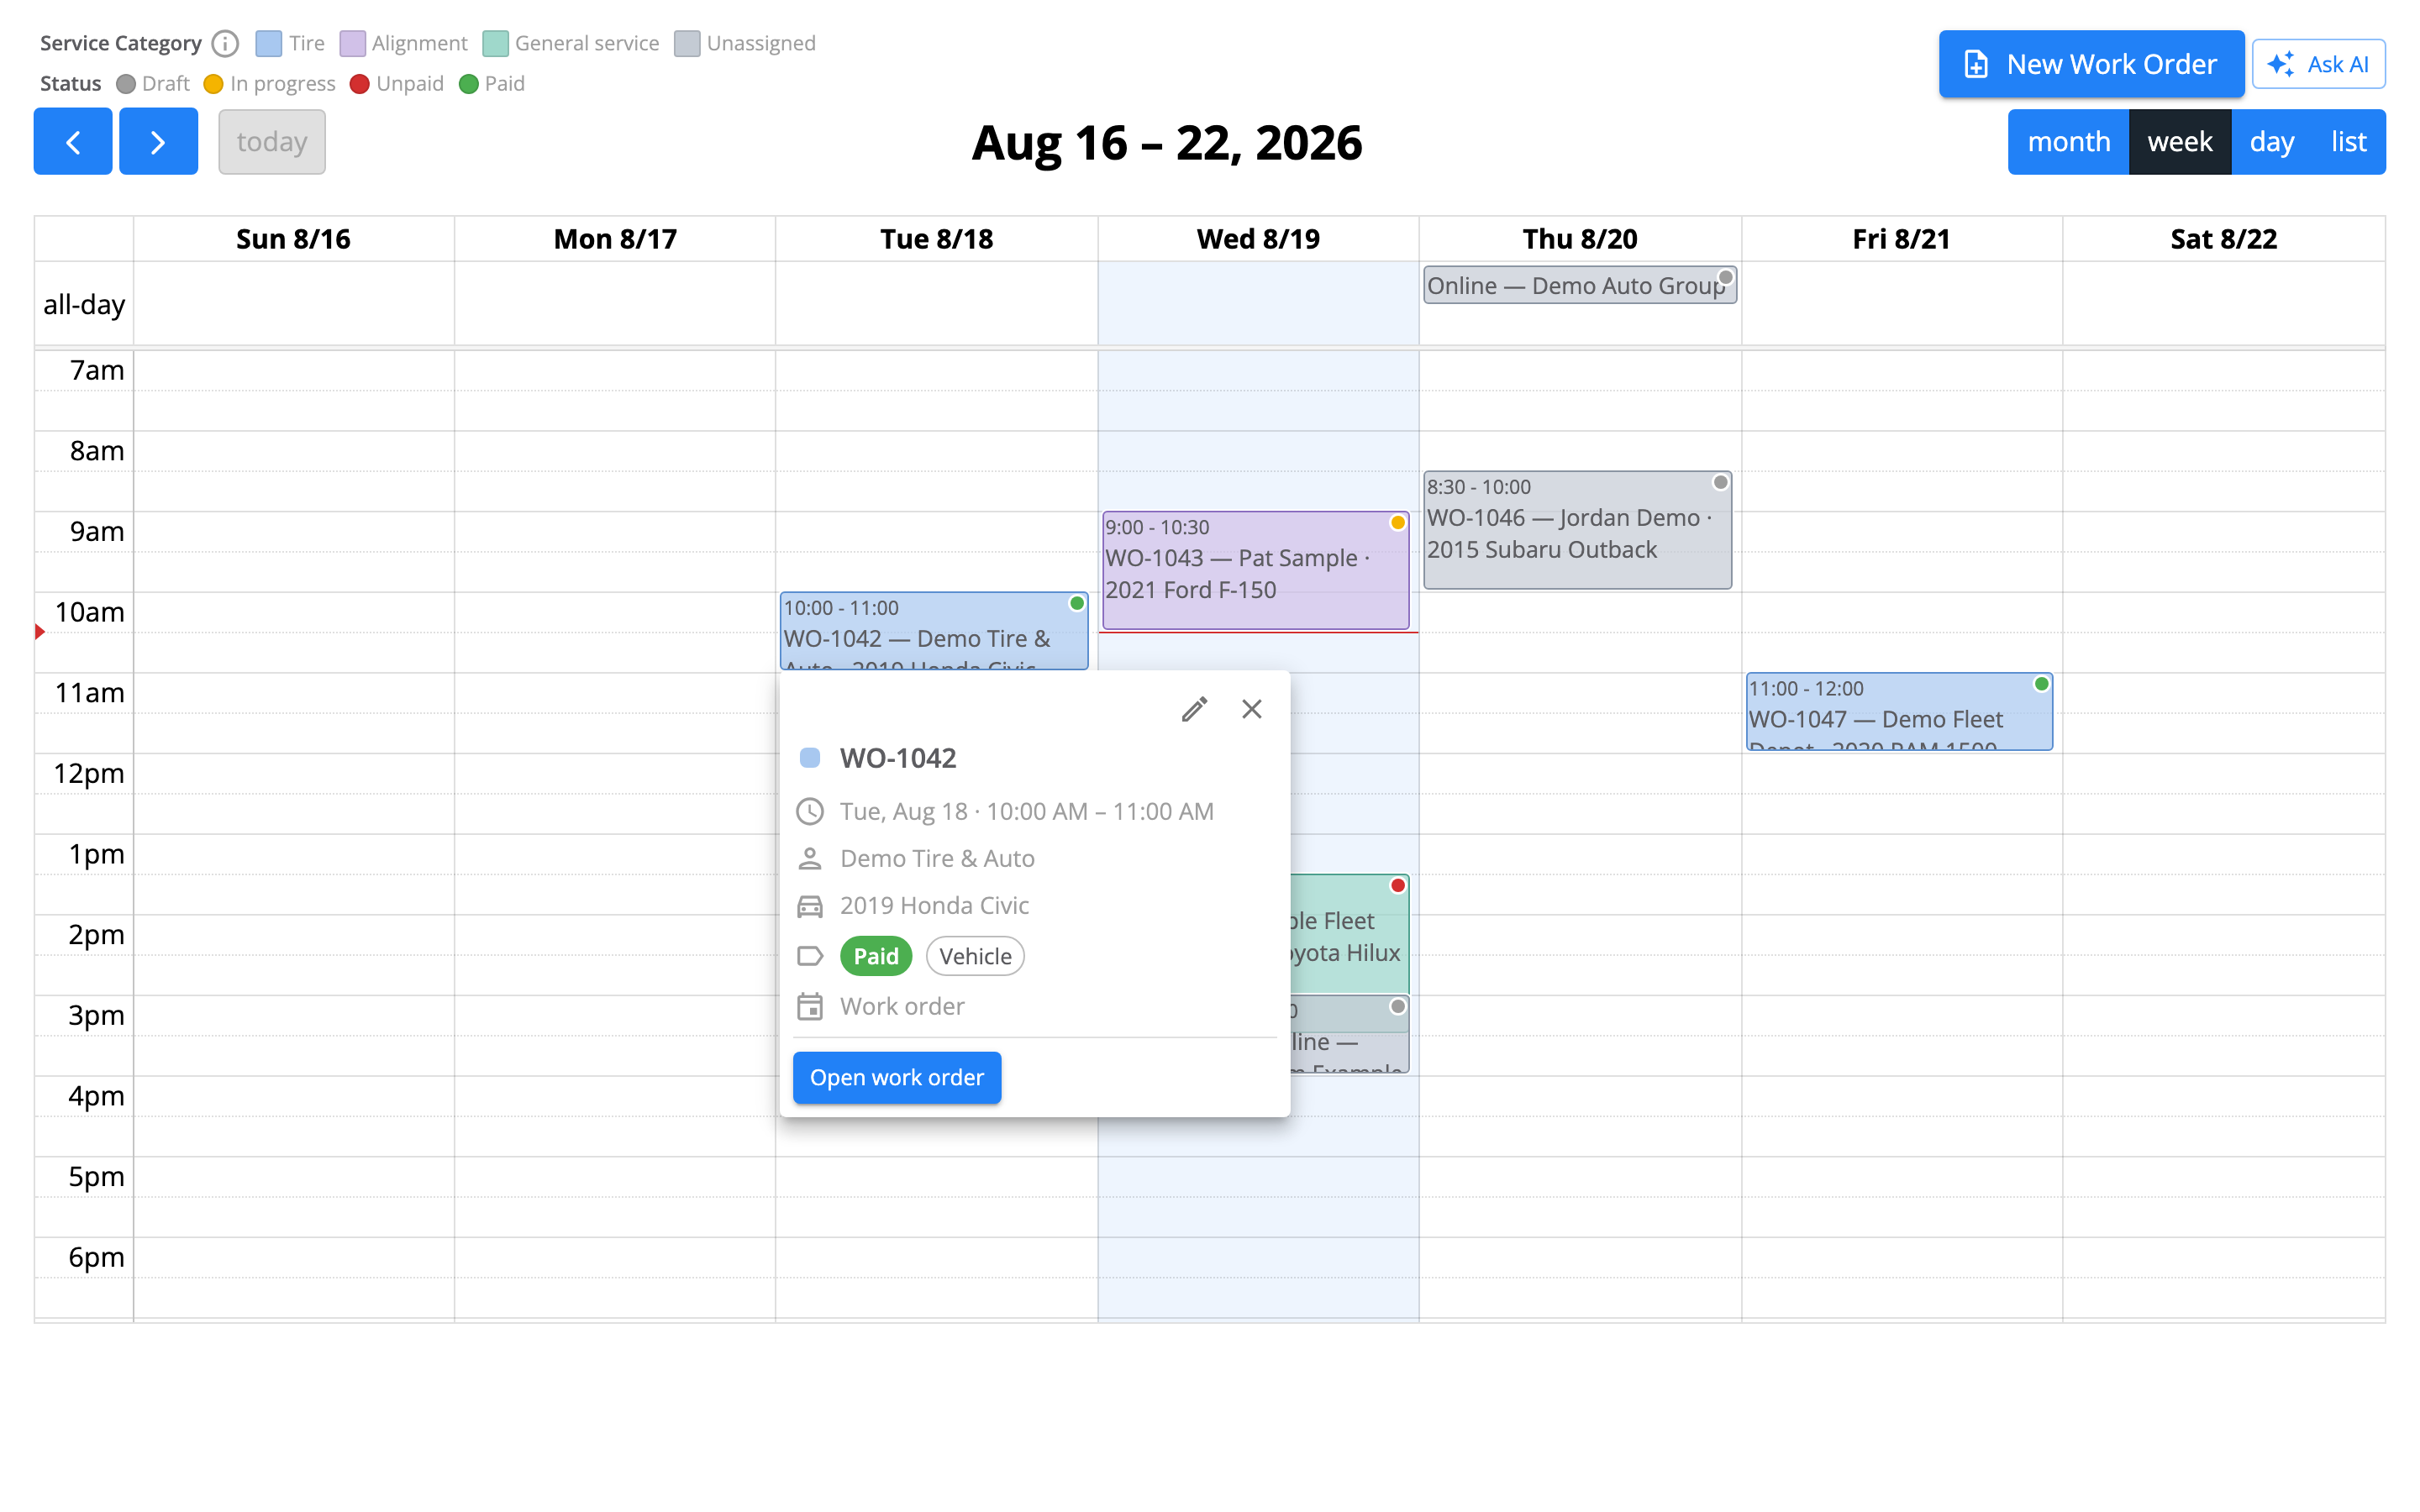
The card for a work order. Only Open work order appears here — Convert and Cancel belong to online orders.
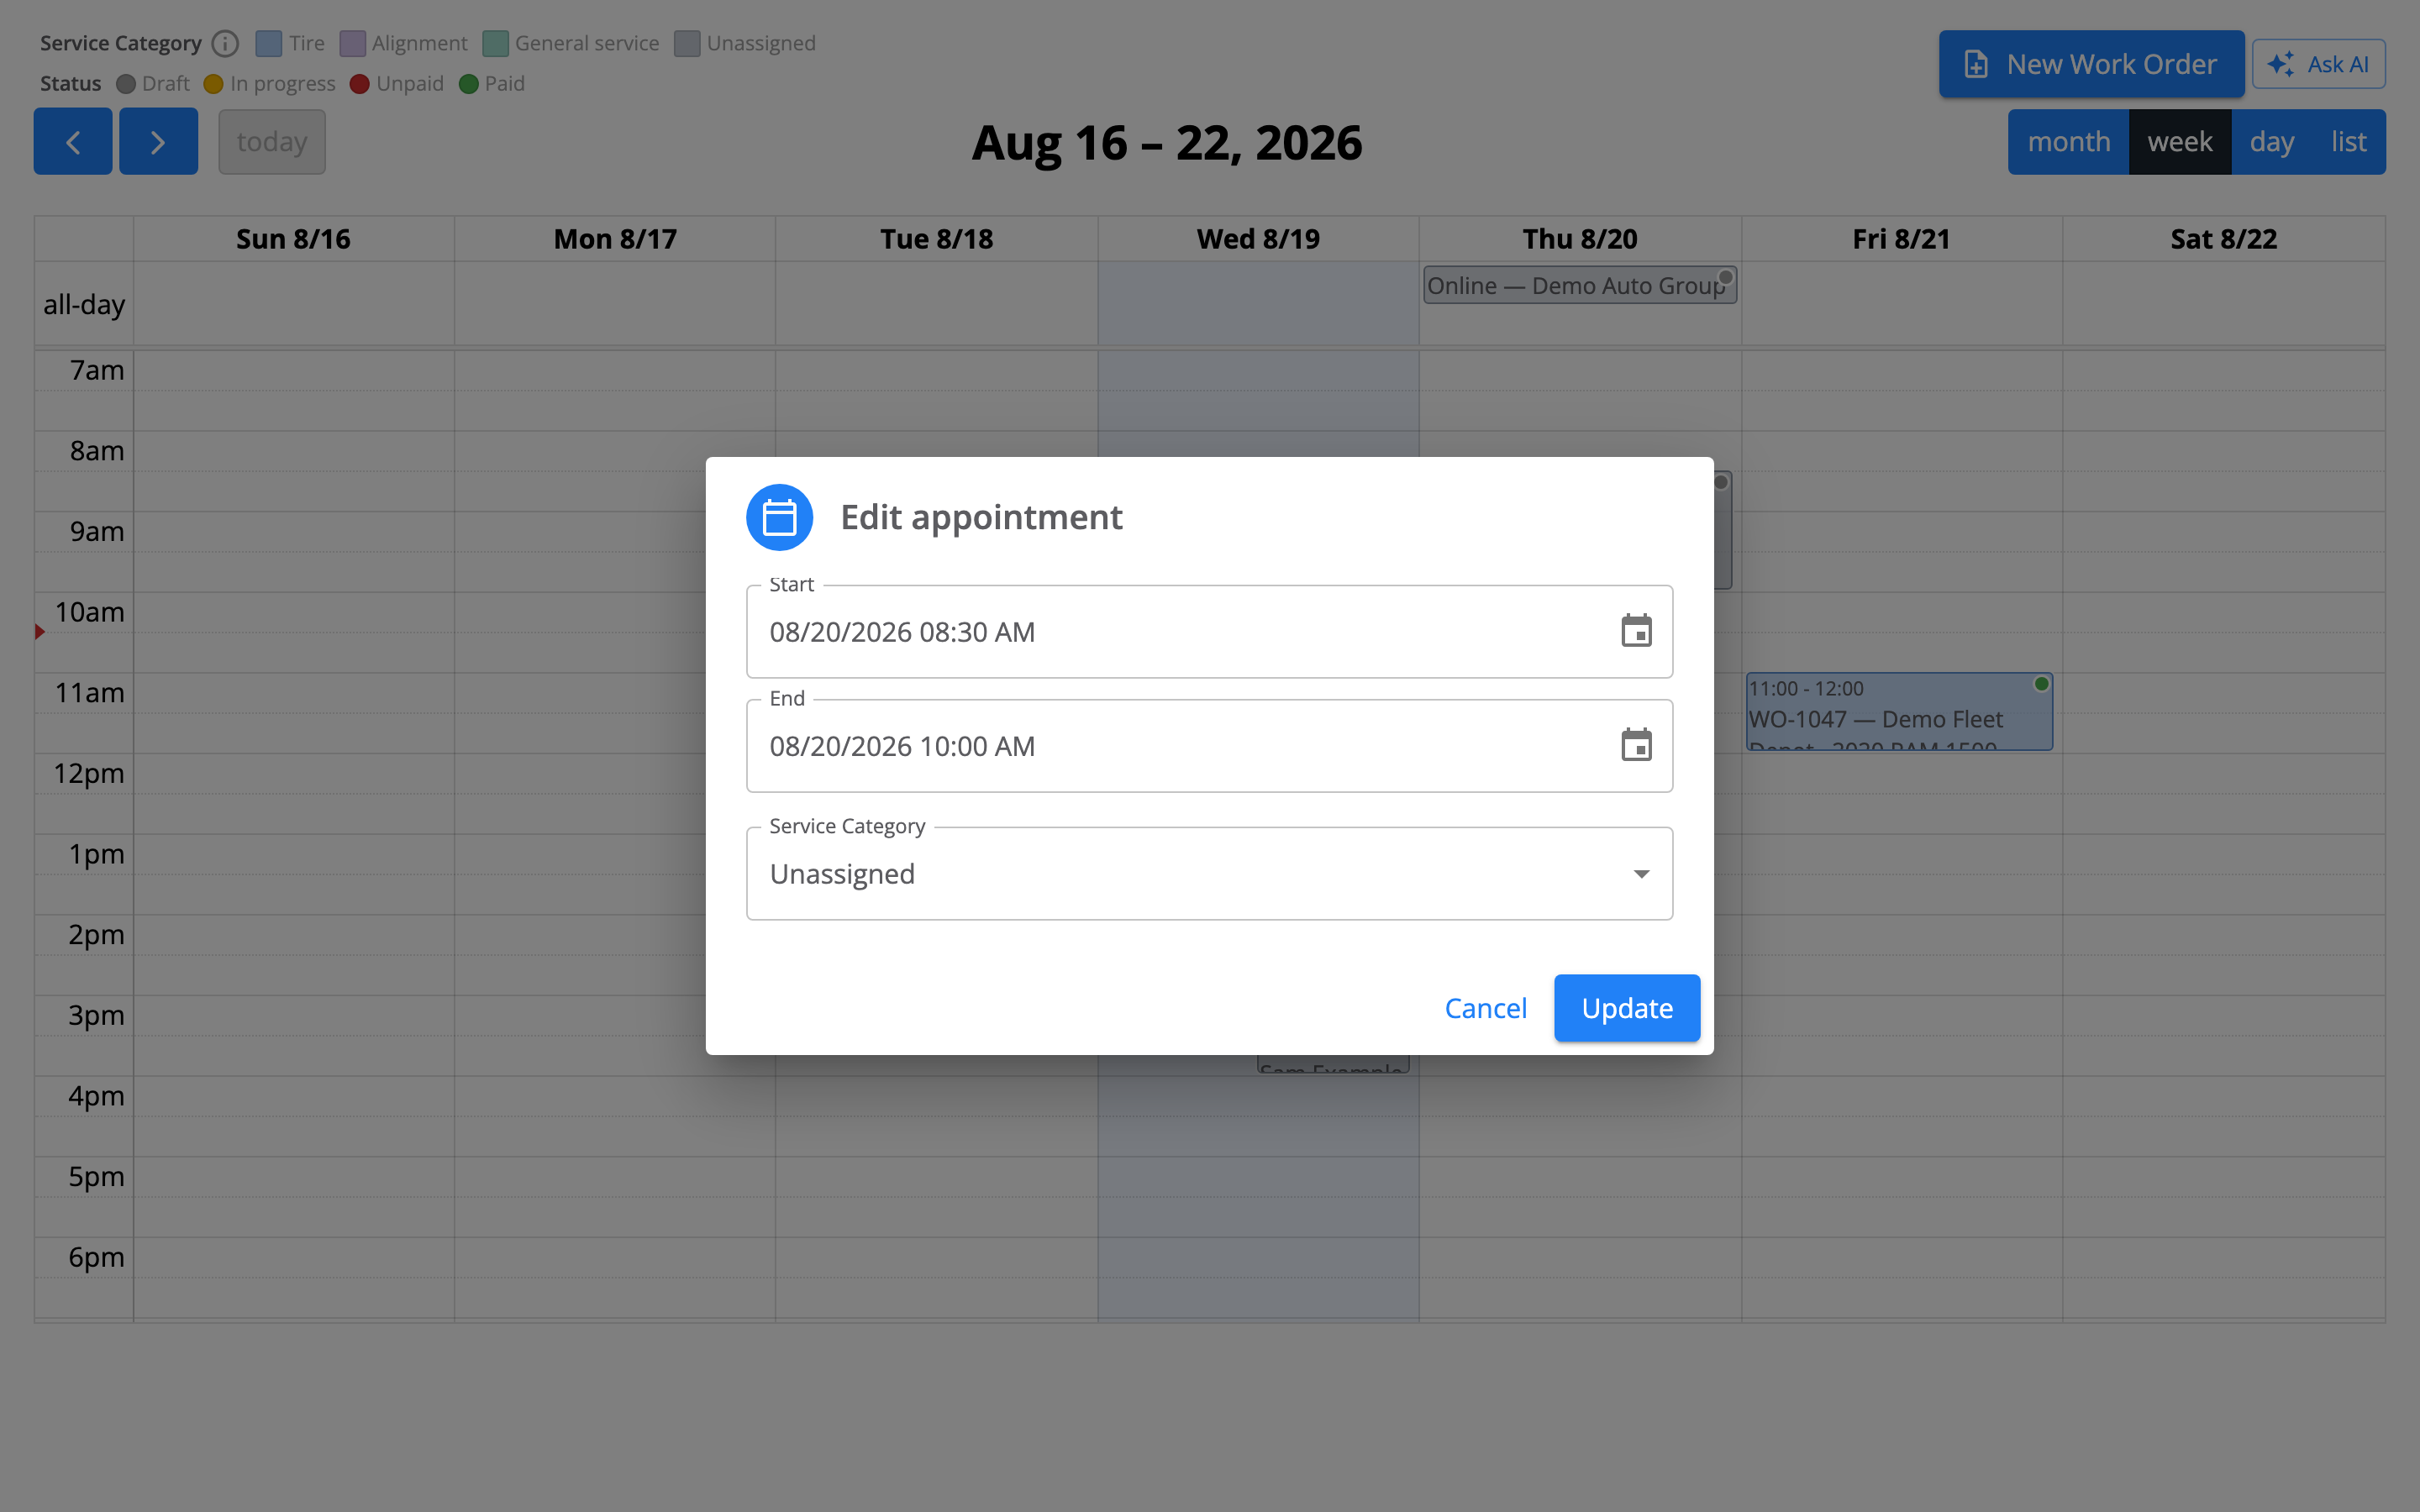
The Edit appointment dialog, shown here on a different appointment that has no service category, so the dropdown reads Unassigned.
Start a work order from the schedule
A New Work Order button sits above the grid, so you can start a booking you took over the phone without leaving the calendar. Every appointment you create starts from a work order. Online orders are the exception, because the customer’s booking creates those. You cannot create a standalone calendar appointment and attach a work order to it afterwards.Set up your service categories
Service categories are the kinds of work your shop takes bookings for, and they drive the color coding. If your shop has Scheduler turned on, set them up under Settings → Organization → Service Categories. The ⓘ icon beside the “Service Category” key on the calendar links straight there. If you cannot find that page, contact support. Anyone can open the page, but changing service categories needs Admin access to the shop. Without it, the page shows a notice and the switches stay off. Ask an Owner or Admin at your shop to make the change. Add categories with care. You choose from the fixed set — Tire, Alignment and General service — and once you add one to your shop you cannot remove it. The app offers no way to switch one off again. Giving an appointment a service category is optional. Anything without one shows pale blue-gray and reads as “Unassigned”. Two or more appointments can share a slot. The calendar does not stop you, by design, because shops routinely run several jobs at once.Ask AI about your schedule
An Ask AI button opens a panel beside the calendar. Ask about your schedule in plain English:- “Do I have a free spot next week?”
- “Where did we schedule Pat Sample’s next appointment?”
- “Which service categories are busy on Tuesday?”
Using the scheduler on a phone
The scheduler works on a phone, with some deliberate differences:- It opens in Day view. Day and List are the two views on offer, from a switcher below the grid.
- The calendar turns dragging and resizing off. A long-press drag on a time grid fights with page scrolling and works badly. Tap the appointment, then the pencil, to change the start, the end and the service category.
- Both color keys start collapsed, and each opens on its own arrow. Open the Status key separately if you need the dot meanings.
- The phone hides two of the information lines above the grid, to leave more room for the schedule. It hides the count of work orders without a set time, and the note that service category details are still loading. The warning about an incomplete calendar always shows, shortened to just the number.
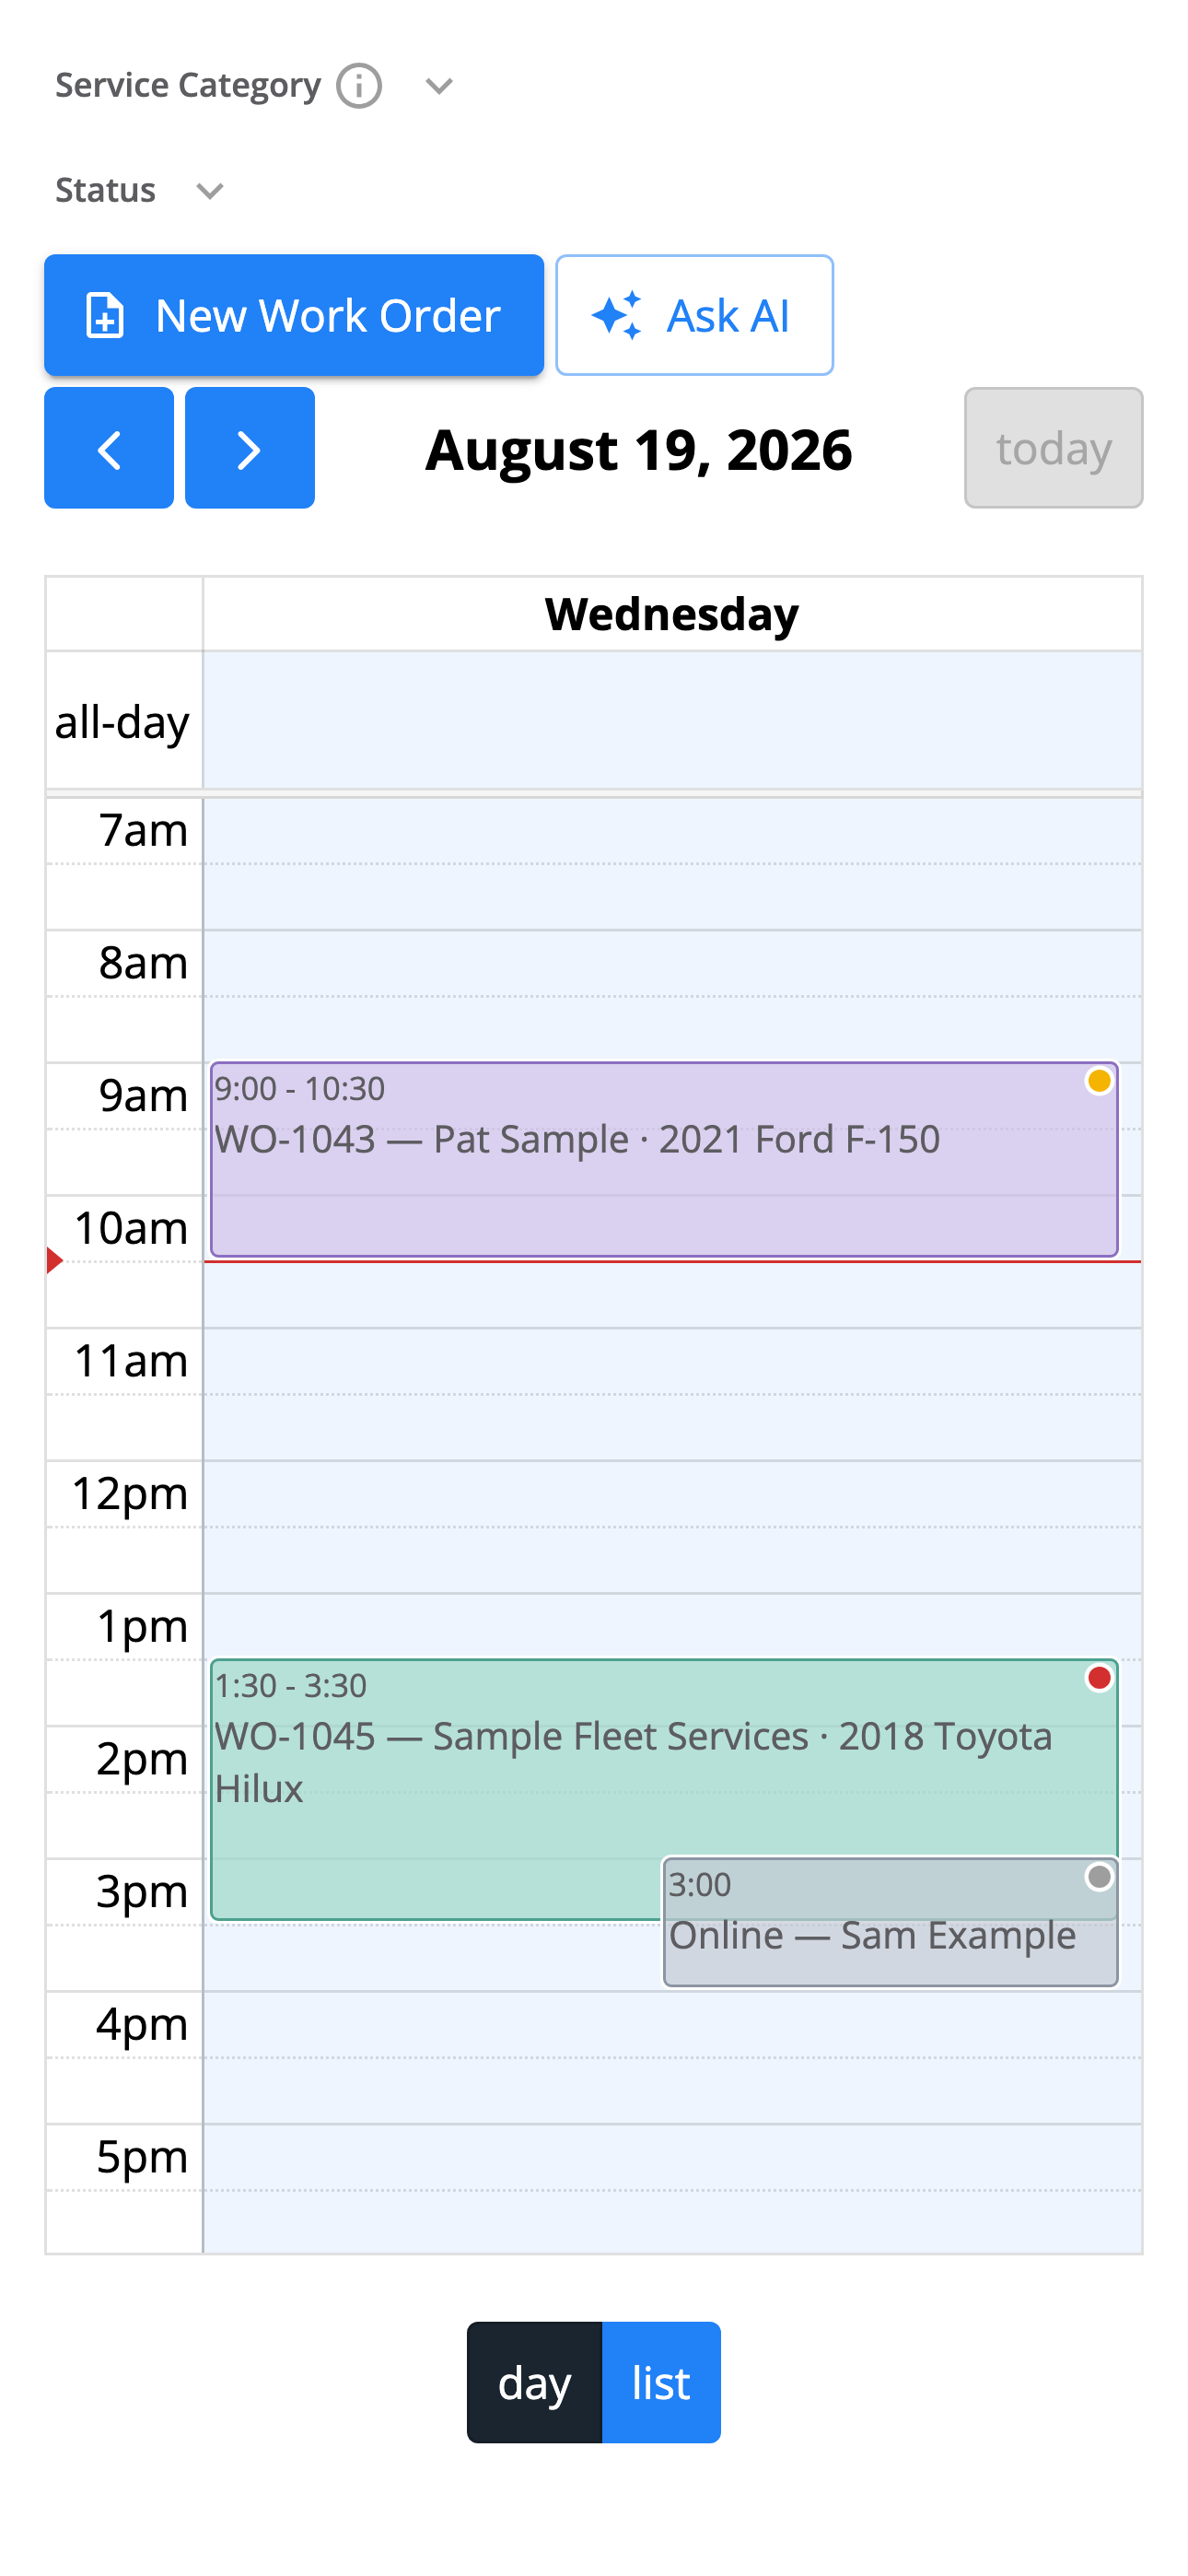
Day view on a phone, with both keys collapsed and the day and list switcher below the grid.
Times and time zones
The calendar shows times in the time zone set for your shop, not the time zone of the device in your hand. Two employees at the same shop see the same schedule wherever they are. If your shop has no time zone set, the calendar still shows every time in one fixed zone for everyone. That zone may not be your shop’s own, so times can sit an hour or more away from the clock on your wall. The Ask AI panel shows a notice when this is the case. Contact support to set your shop’s time zone. There’s one inconsistency to know about: the work order detail page shows appointment times in your browser’s time zone. If you work from a different time zone to your shop, that page and the calendar disagree. The calendar is the one showing shop time.Scheduler limitations
- Not always a complete view. A very busy shop can book more work than the calendar loads at once — see What appears on the calendar.
- No side-by-side columns. The calendar shows service categories as color only. It cannot give you nine bays as nine columns, or label columns by technician.
- No way to block out time. The calendar cannot show a technician being off, a closure, or equipment down. Nothing on it marks a slot as unavailable.
- No shop hours on the grid. The calendar opens near your opening time, but it does not shade your closed hours. Nothing stops someone booking 2pm on a Saturday at a shop that shuts at 2pm.
- Online orders appear before confirmation. Any loaded online order with an appointment date shows, confirmed or not. The calendar does not necessarily load every online order.
- No estimates or leads. The calendar shows work orders and online orders only.
- A fixed list of service categories. Tire, Alignment and General service are the ones on offer.
- You assign service categories by hand. The calendar does not pick them from the work on the order.